
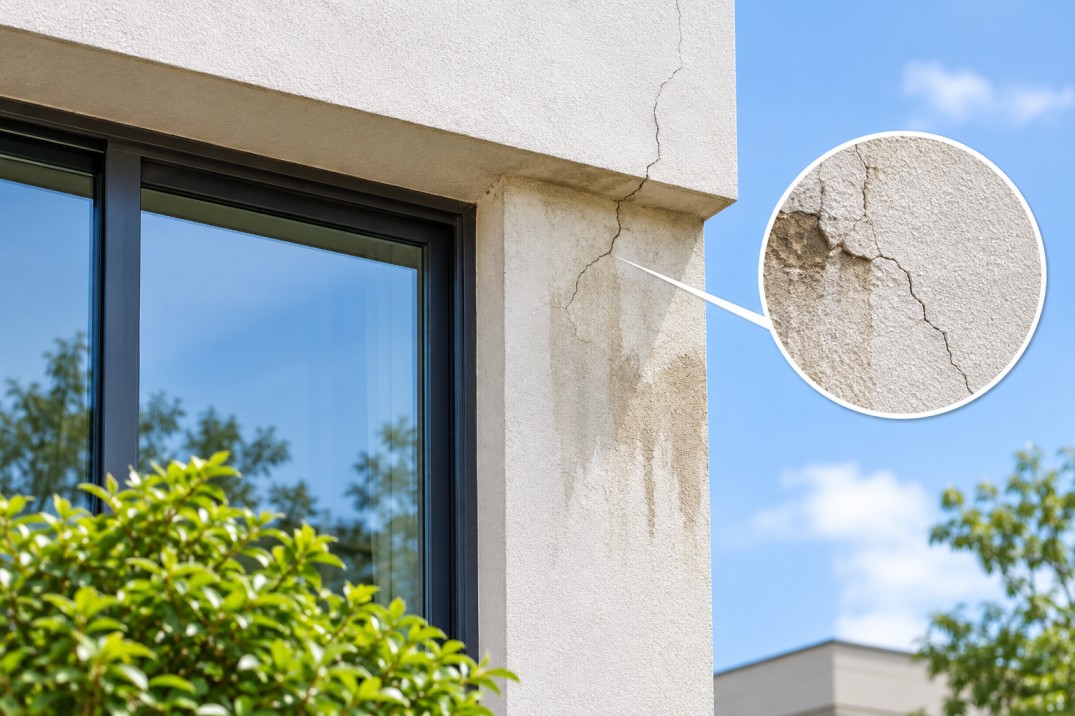
You are walking around the building when you notice a thin crack running out from the corner of a window. Or a dark streak under a ledge that was not there last season. Or a patch of wall that feels slightly soft when you press it. From the street the wall still looks fine, and you are wondering whether this is only cosmetic or the start of something bigger.
If that sounds familiar, you are in a common position with an exterior insulation finish system (often shortened to EIFS). This guide explains what usually sits behind these signs, what you can check yourself without buying anything, and when it makes sense to bring in a specialist.
What an exterior insulation finish system is
An exterior insulation finish system is a layered wall covering. Insulation boards are fixed to the wall, a reinforcing mesh is embedded in a base coat over the boards, and a textured finish coat goes on top. Each layer has a job, and the surface you see is only the last one. That matters, because a problem you can see on the surface often starts in a layer you cannot.
Why these problems happen
Before looking at fixes, it helps to know what is usually going on. The cause varies from building to building, so treat the list below as the usual suspects rather than a diagnosis.
The most common cause is water finding a way behind the finish. The surface sheds water well, but the weak points are the edges and openings.
- Water entering at joints and openings. Window and door edges, pipe and cable penetrations, and expansion joints are the places where the finish stops and something else begins. If the sealant there cracks or pulls away, water can get behind the system.
- Cracks in the base coat. Knocks from impact, or movement in the wall, can crack the base coat. A fine crack lets in a little water each time it rains or when sprinklers hit the wall.
- Preparation or detailing issues at installation. If the wall was not clean, sound and dry when the system went on, or if the details at corners and edges were not done carefully, problems can show up later.
- Heat, UV and humidity cycles. Walls expand in daytime heat and contract at night. Over many seasons this movement can open small cracks, particularly around openings.
Persistent moisture behind the finish is the one to take seriously, because over time it can affect the insulation boards and the wall beneath. Surface staining and hairline cracks on their own are much less worrying, but they are worth tracking.
Checks you can do yourself, with no products
These steps cost nothing and will tell you a great deal. They also give you useful information if you do decide to call someone.
1. Map the wall
Walk every elevation and note each crack, stain and soft or hollow-sounding spot. Photograph each with a date and something for scale, such as a coin or a ruler. A simple sketch of the wall with numbered marks works well.
2. Look for water sources
Check whether gutters and downpipes are clear, whether AC condensate drains onto the wall, and whether irrigation or sprinklers spray the facade. Redirecting a sprinkler head or clearing a drain is often the cheapest fix of all, and stains that line up with a water source are a strong clue.
3. Inspect the joints
Look closely at the sealant around windows, doors and penetrations. Note any that are cracked, shrunken or lifting away from the surface. You do not need to repair them yet. A list of failed joints is already half of a good diagnosis.
4. Test for soft and damp areas
Press gently on suspect areas with the flat of your hand and compare them with a sound area nearby. Note anything that feels spongy, looks bulged or sounds hollow when you tap lightly. Check again after rain.
5. Clean gently and keep a log
Dust and sand can hide cracks and make stains look worse than they are. Wipe the wall with a soft brush or cloth and clean water. Avoid high-pressure washing, which can force water into joints. Then revisit your map every season, checking whether cracks have widened or stains have grown. A mark that stays the same for a year is a different problem from one that changes month to month.
Why common quick fixes often fall short
- Painting over cracks. It hides the crack without closing it, so water still gets in, and it covers up the evidence you need to track what is changing.
- Filling every crack with whatever sealant is to hand. A filler that does not suit the system or does not flex with the wall tends to crack again, and a poor patch can trap moisture behind it.
- Pressure washing the stains away. It can push water into joints and damage the finish, and it does nothing about why the stain appeared.
- Waiting and hoping. Many marks are harmless, but without a map and a log you cannot tell which ones are not.
What these have in common is that they treat the surface. If the cause is water behind the finish, a surface treatment cannot fix it.
When a professional repair makes sense
Your own checks may show a pattern: a damp or soft area that persists, cracks that keep returning, or boards that feel loose or damaged. At that point the problem usually sits below the finish coat, and a repair has to go below it too.
This is the job Petroline’s EIFS service is set up for. According to the service description, the work starts with cleaning and priming the surface and checking for cracks or moisture issues before anything is applied. Insulation boards are then fixed in place with added mechanical fasteners, reinforcing mesh is embedded in the base coat, and textured finish coats go on last.
Because the process begins with a check for moisture and cracks, it deals with the layers where the cause often sits, rather than the finish coat alone. That is the step a surface patch skips.
Who this is not right for
- Owners of a wall with only hairline surface marks that have not changed over a season. Your map and log may show there is nothing to repair, and a full EIFS repair would be more than you need. The process described above starts with a check for cracks and moisture for exactly this reason: the check comes first.
- Owners whose wall problems turn out to come from the concrete or structure underneath, such as deep cracking in the substrate itself. Petroline lists concrete repair and crack injection as separate services, so this may be a different job.
- Anyone who only wants a colour change. A repaint is a different job from repairing the layers underneath.
Where to go from here
Start with the map. Even if you never call anyone, a dated record of what you see will tell you whether the wall is stable. If your checks point to moisture or repeated cracking and you would like a second opinion, you can request a quote from Petroline, whose EIFS process starts with checking for moisture and cracks.
FAQs
1. What causes cracks and damp patches in an Exterior Insulation Finish System (EIFS)?
Cracks and damp patches in an Exterior Insulation Finish System (EIFS) are commonly caused by water entering through damaged sealant joints, window edges, door openings, and wall penetrations. Poor installation detailing, impact damage, and temperature changes can also create cracks. If moisture gets behind the finish, it may affect the insulation boards and the underlying wall.
2. How can I tell if water is trapped behind my EIFS exterior wall?
Common warning signs include persistent damp patches, soft or spongy wall areas, bubbling, bulging, dark stains, and sections that sound hollow when tapped gently. You can also inspect the wall after rainfall to see whether the affected areas become darker or expand. A professional moisture inspection can help determine whether water has entered behind the EIFS layers.
3. Can small cracks in an EIFS finish lead to serious wall damage?
Yes, small cracks can allow rainwater to enter the system, particularly around windows, doors, and joints. Repeated moisture exposure may damage insulation boards, weaken adhesion between layers, and affect the wall underneath. However, not every hairline crack indicates serious damage. Monitoring changes and identifying the source of the crack are important before deciding on repairs.
4. What is the correct way to repair cracks and water damage in an EIFS system?
The correct repair method depends on the extent and cause of the damage. It generally starts with inspecting the affected area for cracks and trapped moisture. Damaged sections may require removal or repair, followed by suitable surface preparation, insulation board replacement where necessary, reinforcing mesh installation, base coat application, and a compatible textured finish. Repairing the source of water entry is equally important to prevent recurring problems.
5. When should I hire a professional EIFS repair contractor instead of fixing the damage myself?
You should contact an EIFS repair specialist when cracks continue to return, damp patches remain after dry weather, wall sections feel soft, or the finish becomes loose or bulged. Professional assessment is also recommended when water damage appears around windows, doors, or expansion joints. A specialist can identify problems beneath the surface and recommend repairs that address the affected layers rather than simply covering visible damage.